I've been asked the following question by my readers several times "How do you get screen captures from the iPhone and highlight some areas? So instead of just answering my readers individually I decided to write a post with the steps I take to accomplish it. This way everyone wins.
First of all, I have the Photogene app which is a really good photo editor. This app has a lot of really great editing tools, it's like having a mini version of PhotoShop on your iPhone. You can download it here.
After you download the app you need to get all the photos you want to use as screen captures. If you're writing about the iPhone and you need some screen captures, you can press the Home and sleep/wake button at the same time (see image to right). This takes a photo of your current screen and the photos are saved automatically in your Camera Roll.
OK, so now you have all the photos you need so let's get down to business.
1. Access the Photogene app.
2. Tap Edit new photo and then select the photo from your Camera Roll.

3. Tap the crop tool (scissors) and resize the box to cover the portion of the photo you want to keep and tap Crop. This will trim the photo to your liking.

5. Drag the square figure onto the photo.

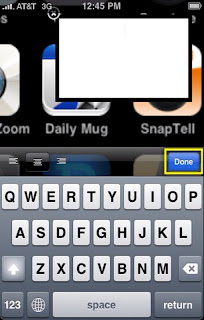
6. Double-tap the square figure to remove text and click Done.

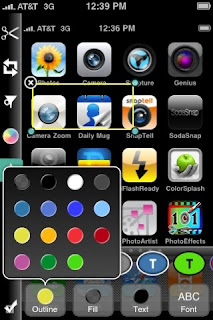
7. Tap the outline tool and select yellow and tap the fill tool and select transparent. (Choose the outline color that will be more visible with the background color of your photo.)

8. Put your finger in the middle of the highlighted square figure and drag it to the area of the photo you want to highlight.
9. Use the circled corners to resize the square to fit the area you want to highlight.
10. Tap the Done icon (check mark) and tap Save.

All your photos will be stored in your Camera Roll. Now follow the same steps with all the photos you want to use as screen captures. At first this might seem to long of a process but it's not. Each step takes a second to do and after you do a couple of screen captures you'll be able to do this in your sleep :O)
By the way, all these screen caps with the exception of first full iPhone photo were taken following these steps. To me this is one of the most productive apps that I have. I recommend you play with it because this is just one of the ways you can use it but it does so much much more.
If you want to be more productive you can paste those photos into an e-mail and use them to write an article in your inbox, send it to Posterous, and your article will be live in no time in all your social media sites.
What other cool things do you do with Photogene or any other photo app?


No comments:
Post a Comment