December 29, 2009

Review: Do you Poken?

Are you tired of having to write down your contact information or carry around business cards? Well if your answer is yes then there is a solution for you, Poken.

Poken is a USB that carries your contact information including your social networks. All you have to do is touch another person's Poken with yours and it swaps information. It's like the Bump app for the iPhone.


Poken's come in different forms and colors and you can even customize it with your brand. They are also pretty reasonable in price.

If you're curious, check out this video to see it in action.

Do you Poken?


Share/Save/Bookmark

December 11, 2009

Review: Do you find Facebook too complicated? Then try Facebook Lite

Facebook released a more simpler version of their existing site called Facebook Lite. A public preview is available to those that already have a Facebook account and that use the English (US) version. You can take a look at Facebook Lite but before you do read on so you know what to expect.

Now remember lite means that you won't have all the features available in the regular Facebook site but if you're a person that only wants to read the latest status, share pictures and videos then this version is for you.

Before I continue I would like to add that I've erased the photos and names of my friends on the screen captures to protect the innocent :O) Just because I want to share information with the general public doesn't mean they want to share their lives with everyone, right?

So here goes my quick overview of the site, hope this helps.

Let's start by saying that after you log in your default page is still what we call the Home page in the regular Facebook so that hasn't changed. With that said, let's look at the features that have changed starting with the top navigation.


Facebook logo

It's just not a logo, it's the only way you get back to your Home page. So remember this important detail or else you will have no clue how to view all your friend's gossip.

Profile

Through this link you can view and update your profile.

Events

Shows you the latest events. So if some one sends you an invite to an event or it's some one's birthday then this is where you would go to check it out.

Chat

No more chat at the bottom right side of the page, it's right at the top. When you click Chat a new window opens which looks slightly different then the chat in the regular Facebook. As you can see you still have the Friend List and Options feature at the top of the chat.


Below this information you will see the various friend lists and your friends. To chat with a friend just click their name, and a new field at the bottom right of the window will appear where you can type your message so the functionality hasn't changed.

By the way if you see a dark dot next to the Chat link on the top navigation that means you're offline.

Inbox

The major difference here is that you don't have the option to delete a message from your inbox by clicking the X next to the subject. You need to view the message and then click Delete.

Settings icon
By clicking the icon you access the privacy settings and account information. This is another important section to remember as you can switch back to the regular Facebook site through here (see Changing your Default Site section below).

Door icon

The icon is used to log out.


Home Page

This page is very clean and simple. Remember how I mentioned this was a simpler version, well
here you can see it.


In the middle of the page you'll see by default all your friend's and group stories and if you want to view only the top stories then you click View Top Stories. If there is any birthday occurring it will display in this section of the page as well.

To the right side of the page you will only see People you may know and the ad section. That's it! Simple right?

To update your status click Write, to add pictures click Post Photos, and to add videos click Post Video buttons. That's it! No notes, no links, no gifts....


Profile Page

The profile page is so simple to update that even a cave man can do it :O)

First notice that you don't have all the tabs at the top, and no side boxes either. All you have are the same three buttons from the Home Page and they work the same too. Under these buttons you'll have all your updates like you usually do.


Editing your profile

Under your profile picture you have the Wall, Info, Friends, and Photos & Video links. To update your profile picture or your information just click on Info and then Edit Profile link at the top of the page. You can toggle from the Basic and Favorite information sections by clicking the buttons.


One cool thing Facebook is doing is displaying tips on the right side of your profile on how to use Facebook Lite so keep your eyes opens.


To go back to your profile just click on your name.


Friends

To view all your friends click the Friends link under your profile picture. In the regular Facebook site your list of friends showed their current status and you had the option to send them a message but not in this version. All you can do from this list is to unfriend some one by clicking the X.


You can view the list of groups you're a fan of by clicking the Fan of link at the top of the page. By clicking the X you will unfan the group.... I wonder if that word will be added to the dictionary next year, hummmm.

Photos & Videos

Click the Photos and Videos link under your profile picture to view your photos and videos. The page is divided in three sections. The top section displays all the pictures you've been tagged on, the middle section displays all the videos you've been tagged on, and the bottom section displays all your photo albums.


You can't add photos and videos from this section. To add photos or videos remember to click
the Post Photos and Post Video buttons at the top of your profile or Home page. After that the process is the same. Now the tag, like and comment features on photos and videos are positioned differently, see below.


Changing your Default Site

If you decide you want to continue using Facebook Lite you can set this version as your default from the Settings sections. Once you access the Settings section click Default Site.


Select the default version, and click Save.


If you select Facebook Lite that means that every time you access http://www.facebook.com/ it will take you to Facebook Lite.

Also notice you can use both versions by selecting "Let me switch between Regular Facebook and Facebook Lite" option. When you select this option you will see on the top right corner of the page a link that says "Back to regular Facebook" or Try Facebook Lite depending on the version you're using at the moment.

In the Settings section you can also update your privacy settings, change your password, e-mail, and more.

I really like the lite version especially because I'm not a Farmville or Yoville person. If it wasn't for me using some applications that incorporate some more advance functionality I would use the Facebook Lite as my default. In the meantime, I've set my account to use both.

Just remember that with the launch of any new web site or new version of a web site things don't work 100% so things are going to go wrong. Just report them fast that way Facebook can correct them quicker.

Well that's my quick overview of Facebook Lite, have you used it? Share your thoughts in the comment section.


Share/Save/Bookmark

November 28, 2009

App Top List: My All Time Favorite Top 10 iPhone Apps

Time has past since I bought my iPhone actually two years this December, and one upgrade later so I thought an all time top 10 app post was over due. Even though some of these apps have been around for a while and some are pretty new I consider them my all time favorites as I use them all the time.

So let's get to it! The apps are in the order I use them the most being #1 the one I use the most and my all time favorite.

10. Gaggle Social Web Browser - Sounds like Google and it's pretty much the same. It's a search app that uses Google to find the information but with the ability to share the sites by tapping on the Share button. You can share on Facebook or Twitter or bookmark the site on your iPhone. Sharing with Tumblr, Digg and Delicious is coming soon. The app is very handy and it's free.


9. Shazam - Love this app and the fact that it's free is amazing to me. This app recognizes the music currently playing around you and gives you the artist and song name along with information on where you can buy the song and view the available videos.

8. Animoto - is a service that allows you to create free short videos by using your still life pictures. You can also create and download unlimited full-length videos for a minimal yearly fee which is well worth it when you see the professional job this service does with your pictures. You can add music, text, and highlight certain pictures and the services mixes it together to form a masterpiece. You can also access the videos you have created online via the app. Cost of the app, FREE.


7. CheckPlease - Tip Calculator - Ever been at a group dinner party and have to split the bill and no one has a calculator? This nifty app will add the bill amount plus tip, and then split it between the number of people you choose. You can also opt to not tip on taxes, apply a discount or coupon amount, round up or down on tip and total and best of all you can post the amount of the bill directly to PocketMoney. I have the paid version of the app which is $0.99 but they also offer a lite version for free.


6. PhotoArtist - The name implies it all Photo Art. You can select any of the photos in your library or take a new one and then apply any of the following six filters: cartoon, watercolor, illustration, halftone, mono, and pen and your photo is turned into art. It's not a photo editor likePhotogene, it converts your photo's into artwork as the name indicates and it does a great job at it. It's only $1.99 and I think it's well worth it.


5. Photofunia - There are lots of app that let you place your picture into a frame or even into a character but most of the work is done manually by you. With Photofunia all you do is select the photo from your camera roll or take a new one, select one of the 100 effects and this nifty free app recognizes the face in the photo and places the face where it goes. It's very neat, and the results look very professional.


4. Instapaper - This app let's you save articles and web sites for offline reading. You can categorize your articles by folders, star rate them, and share them on Twitter and Tumblr and if you have Echofon Pro it integrates with it. You can also browser the app's directory for more reading material or subscribe to some one's starred items and let them recommend more articles. I have the paid version which is $4.99 but they also have a free version available.

3. Facebook - After version 3.0 this app became amazing. Now you can see pretty much everything that goes on Facebook. The app is free and the only downside is that the videos do not play on the iPhone.


2. Echofon Pro - This app use to be TwitterFon Pro, a Twitter app and it goes for $4.99. You can manage multiple Twitter accounts, it has instapaper integration, push notification for mentions, Twitter search and trends, photo and video upload and so many other features. There is also a free version available.


1. Photogene - With Photogene you can crop, apply filters, color adjustment, exposure, and saturation. You can also enhance your photos with effects, captions, frames, borders, and even rotate the image. You have the option to edit photos from your library or taking a new one. Photogene brings photo editing to another level and it's just so simple to use. The app is $2.99 but it's well worth it. Some people prefer the new PhotoShop app but to me that app doesn't do half of the things Photogene does so I'll stick to this one for now.

Now of course these are only 10 out of 110 apps I have but these are the ones that make my life just a little easier.

What about you? What apps are your all time favorites?


Share/Save/Bookmark

November 12, 2009

FAQ: What is Google Wave?

You've probably heard about Google Wave and how everyone is trying to get an invite to try it out but do you really know what it is?

This video gives you the simple round down on Google Wave in a very unique way.


October 20, 2009

How to create screen captures with highlighted areas on the iPhone


I've been asked the following question by my readers several times "How do you get screen captures from the iPhone and highlight some areas? So instead of just answering my readers individually I decided to write a post with the steps I take to accomplish it. This way everyone wins.

First of all, I have the Photogene app which is a really good photo editor. This app has a lot of really great editing tools, it's like having a mini version of PhotoShop on your iPhone. You can download it here.

After you download the app you need to get all the photos you want to use as screen captures. If you're writing about the iPhone and you need some screen captures, you can press the Home and sleep/wake button at the same time (see image to right). This takes a photo of your current screen and the photos are saved automatically in your Camera Roll.

OK, so now you have all the photos you need so let's get down to business.

1. Access the Photogene app.


2. Tap Edit new photo and then select the photo from your Camera Roll.


3. Tap the crop tool (scissors) and resize the box to cover the portion of the photo you want to keep and tap Crop. This will trim the photo to your liking.


4. Tap the symbols icon (star) and swipe the bottom toolbar to the left.


5. Drag the square figure onto the photo.


6. Double-tap the square figure to remove text and click Done.


7. Tap the outline tool and select yellow and tap the fill tool and select transparent. (Choose the outline color that will be more visible with the background color of your photo.)


8. Put your finger in the middle of the highlighted square figure and drag it to the area of the photo you want to highlight.

9. Use the circled corners to resize the square to fit the area you want to highlight.

10. Tap the Done icon (check mark) and tap Save.


All your photos will be stored in your Camera Roll. Now follow the same steps with all the photos you want to use as screen captures. At first this might seem to long of a process but it's not. Each step takes a second to do and after you do a couple of screen captures you'll be able to do this in your sleep :O)

By the way, all these screen caps with the exception of first full iPhone photo were taken following these steps. To me this is one of the most productive apps that I have. I recommend you play with it because this is just one of the ways you can use it but it does so much much more.

If you want to be more productive you can paste those photos into an e-mail and use them to write an article in your inbox, send it to Posterous, and your article will be live in no time in all your social media sites.

What other cool things do you do with Photogene or any other photo app?

Share/Save/Bookmark

October 17, 2009

The golden ticket is here - Google Wave

As we all know, Google Wave was announced some months ago at the developers conference and I watched the lonnnnngggggg video of their presentation and said to myself I have to get access to this. At this point Google was giving access to a limited amount of people which were actually developers but they were letting anyone request to be invited. So I immediately added my name onto their invitation list with the hopes that I would get access to it very soon. Then another wave :O) of invites when out sometime between late September - early October and nothing arrived in my inbox :O(

Now I'm not an app or gadget developer and I knew Google needed as much developers to get access to this product quickly so they could add more valuable gadgets so I figured I would get my invite with the rest of the normal technology fanatics. No rush here, I knew I would get access some day.

And then came October 14......there it was, my invite. I felt like Charlie Bucket in Willy Wonka and the Chocolate Factory when he found the Golden ticket, I know that sounds a bit pathetic but I know a lot of you felt and will feel the same way. Let's face it, use technology enthusiast are like that. We only need access to a new toy to be happy campers.
I must confess, I jumped for joy when I saw my invitation and automatically signed up which was a quick process btw. Ok so now I'm inside Google Wave and this feeling of WTH do I do now just took over my entire being. I'm usually the kind of person that just figures stuff out and I was feeling like Jim Carrey in Dumb and Dumber. What do I do now? That's all I could hear myself say.

All of sudden I heard a voice say "invite people". What a genius! Why didn't I think of that? Duh, if you're going to collaborate you better start inviting someone and then it should come together, right? You can't collaborate with yourself.

Ok, so now I'm looking for my 8 invites..... where are my invites? I'm thinking to myself that's weird, there is always an invite link or button somewhere on the page and I don't see anything. I called a coworker over and said do you see invite any where? We both searched through the application and nothing. Finally we thought of going to the help section, and we found something like "you'll see the invites when you are entitled to them" or something like that so I figured I would check back later. At all of this I was at my day job.... and at a stressful time may I add so I figured it was almost time to go home so I better finish what I was doing and then later I could access Google Wave when I got home.

Two hours later I logged in, and there it was. A wave with the subject "Invite others to Google Wave", yay!!!!! Now I can start seeing how this works. I invited my brother who btw is another technology enthusiast just like me. Oh but there is still a problem..... the invites are not automatic. Even though you recommend your friend's they don't get instant invites. Google sends them out when they deem appropriate and I understand, this product is on beta and they need to control the amount of people accessing it. Ok so we'll wait.
In the meantime I gave away the other invites amongst my Twitter and Facebook friends.
Anyways, my brother got his invite the next day which is weird because we were under the impression it took about a week but hey it's all good. The faster people get the invites the faster I can start using this, right? No, wrong!

As I mentioned before I'm in the middle of a stressful time at work and my brain cells are non existent so I haven't had the energy to even try to play with it.

Hopefully this weekend I can play around a bit, oh but wait.... my brother is going out of town this weekend so I guess not :O(

I'll just kill the few cells I have left by watching all the videos, reading all the articles about it, and maybe I can add some gadgets. Stay tuned for more.....
What was your first impression?


October 10, 2009

iPhone tip: How to forward MMS and SMS on the iPhone

Forwarding MMS and SMS messages on the iPhone is very simple.
  1. Tap Edit at the top of your messaging screen.
  2. Select the MMS or SMS message you want to forward.
  3. Tab Forward.
  4. Enter the recipient's name or tab the to access your contacts.

  5. Tab Send.
As a little bonus, before you click Send you can click the camera and add or take more pictures and add it to your message.

What other tips do you want to share about MMS?


Share/Save/Bookmark


October 02, 2009

How can I stop e-mail notifications caused by Facebook comments?

Have you noticed that when ever you comment on a photo, link, notes, etc.... you start getting e-mail notifications whenever some one else comments on the same item. Isn't that annoying?
Sometimes the comments get interesting but sometimes it's just a pain. Do we really want to receive an e-mail notifications every time your friend's friends comment on something? Do we even know them most of the time? Probably not. The bad part is that these comments don't have an expiration date. You could have commented on a photo one year ago, and then Joe Smith comes along a year later and adds a comment, and guess what? You get a notification.
Well we also need to think about the social part of Facebook, isn't that why you signed up? Aren't you here to read the gossip? Hey I'm not here to judge. I'm here to give you answers, and here it goes.
Yes, you can stop receiving e-mail notifications on comments that are left after yours. The steps I'm going to give you are for Facebook applications and when I say Facebook applications I'm referring to the ones that are available on your profile when you sign up for Facebook such as Notes, Photos, Links..etc, not Games, drinks or gifts. These are third-party applications that you choose to add. Now of course since these applications are different, the settings are a little different but all in all, it's the same thing.
To change these settings:
1. Click Settings, and select Applications Settings.
2. Click Edit Settings located towards the right of the application name.
3. Click Additional Permissions tab.
4. Uncheck the settings of your choice and click Okay.
The highlighted ones are the recommended ones :O)
You can also change these settings by:
1. Clicking Settings.
2. Select Account Settings.
3. Click on Notifications tab.
And you will also find here these general Facebook e-mail notification settings.
Now just because you changed these settings doesn't mean you're not going to get notifications via Facebook. You can view these notifications by clicking the Notifications icon at the bottom of your page.
I know we're talking about e-mail notifications received caused by comments left but I'm going give you a two for one in this post and tell you what else you should be unchecking.
When you add a third-party application you are pretty much giving the third-party provider authorization to view your personal information. I don't know about you but I personally don't like that. My personal business is my personal business, and your is yours, right?
So here is your bonus and this applies to those fun applications that you chose to add.
1. Go back to Settings, and select Applications Settings.
2. From the Show: pull-down menu select Granted Additional Permissions.
Now only the applications you have granted additional permissions will display.
3. Click Edit Settings located towards the right of the application name.
4. Click Additional Permissions tab.
5. Uncheck Access my data even when I'm not using the application and click Okay.


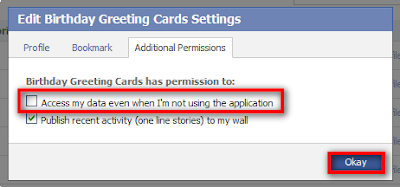
Again, the settings can vary by application and some of them might now have these settings which is a good thing but if they do, uncheck it. Some of these application also have a Send me e-mails settings which you probably want to uncheck as well to avoid notifications when they add a new gift :O)
Did this post help you?


Share/Save/Bookmark

How can I clean up my Facebook Home Page?

As mentioned in the Home Page blog post "What is up with the Home page?", the Home Page now shows news not only from your friends but also from groups, and of course those annoying applications. So how do you limit the information shown on your Home Page?

Before I show you how to do it I first want to say that if you see your name in any image, please do not take offense. These are only images used to illustrate the process and there is no meaning behind it.

So how can you clean up your Home Page to only show what's important to you?

If it's an application you are trying to hide mouseover the right top corner of the news item and click Hide and then select Hide + the application name.

Now in case you want to hide news from a group or friend, you can follow the same steps but select Hide + Friend's name. Right after you hide the news item you will have the option to click on Undo in case you did something by accident.

If you ever decide you want to show those news items again on your Home Page, all you have to do is:

1. Click on Edit Options at the bottom of your Home Page.
2. Click on "Friends, Public Profiles or Applications" depending on what you are trying to edit. In this example I'm selecting Applications.
3. Click Add to News Feed button next to the application (or friend's name).
4. Click Close.

You can also opt to view the hidden stories by clicking on Show xx Hidden Posts at the bottom of the Home Page.

Well hope this helps with you.


October 01, 2009

How can I accept or ignore all Facebook friend request at once?


Yes and No :O(

Unfortunately you can't accept all friend requests at once but you can ignore all of them. I think the reason behind this is because of the privacy settings everyone has on their profile. You might not want all these friends to have the same access to your profile therefore you need to add them one by one. If you think about it, it makes sense, right?

To ignore all friend request:

1. Click on x friend requests (x=number of friend request) or See All link on the top right corner of the Home page.
2. Click on Ignore All link on the top right corner.
By the way if you don't see anything happen when you click the link make sure to either hold down the CTRL key as you click or allow pop-up blockers.
3. Checkmark the box next to Friend requests (x), and then click Ignore these requests.
4. Click Okay.

In step 3 you can also see other requests sent to you by your friends and groups so just make sure you checkmark the correct thing.

Hope this helps!

September 22, 2009

Remember that text from last night?


If you think FML is funny then you haven't laughed hard enough yet. Now there is Texts from last night where users can send text messages to the site by using their area code and others can reply. The number you see before the text is the area code where the text message came from and if you see another text message right below it, it's because some one has responded to it.

You can leave a comment by clicking on reply or rate the messages as good night or bad night.

Here are a couple of them to give you a sample.
(775): I was too high to figure out which of the three doors would lead me to my classroom, so i sat down in the middle of the hallway and ate a twinkie.
(248): Is your delayed response due to the massive amount of judging going on?
(802): My social work teacher just told our class about her bicurios adventures in college
(516): is she hot?
(802): She is now
(702): what made you think it was a good idea to trust the girl that hides tequila in her backpack?
(204): My cousin's wedding had personal beer funnels for each table and a drinking game against the bride and groom. im sorry for ever calling you white trash
(504): She looks like Sash Grey but sounds like Fran Drescher. Advise.
(858): This concert is like a reunion of all my bad sex.
(203): a girl in my class is on a twilight fan site and running her fingers on the screen as edwards body comes up.


Oh and there is an app for this too!!! It's $0.99 for those that would like to know and you can downlad it here Texts From Last Night.

Just remember, you might forget the text messages you send but will we?


September 16, 2009

How do I tag friends on my Facebook status?

This new feature was just rolled out. You can now tag your friend in your status by adding the @ in front of their name. As soon as you do that, you'll see a list of friends with similar names displayed and all you have to do is select your friend from the list.

After you select your friend it will add their name highlighed in blue as a hyperlink and the @ symbol dissapears.

You can also tag more than one person by just adding again the @ in front of the other name.


Share/Save/Bookmark