Yes, you can and it's not a bad idea to do that. You never know what photo will surface from your past and you probably don't want your family, friends or coworkers seeing those crazy days, right?
What you can do is apply privacy settings to your profile in order for these photos to only be visible to you, specific people or a list of friends. It depends on how restricted you want it.
To do this:
1. Click Account.
2. Select Privacy Settings.
3. Click on Customize Settings.
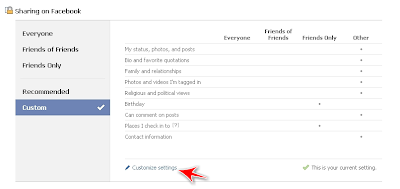
4. Scroll down to the Things others share section.
5. Click the pull-down menu next to Photos and videos I'm tagged in.
6. Select Custom.
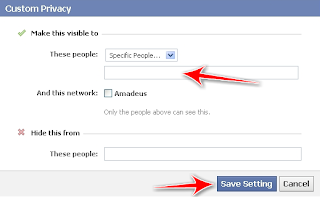
7. Select Specific People to let only some people see these photos or videos.
You can also select Only Me, if you don't want anyone except yourself seeing photos or videos you're tagged in.
8. If you select Specific People then enter their names in the field below the pull-down menu. if you use Friend lists you can type in the name of the list to allow a group of people to view it.
9. Click Save Setting.
You can do the reverse as well. If you don't mind most of your friends to be able to see the photos and videos you're tagged in then you can select the people you want to hide information from.
To do that enter the names or friend list in These people: field under "Hide this from".
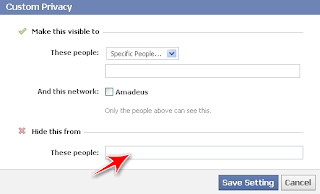
And that's it, from here on only those people will see any photos or videos you're tagged on.
Let me know if that helped in the comment section below.
October 18, 2010
FAQ: How can I hide the photos and videos my friends tag me in on Facebook?
Labels:
facebook,
hide,
privacy settings,
tagged
An artsy person fulfilling my curiosity by figuring out the Hows & expressing them in some sort of creative outlet. I love art in all forms, technology, music, comedy, movies & travel.
October 05, 2010
How To: How to personalize your Facebook Profile link with a customized username
Do you remember when Facebook launched "claim your username"? If not, and you missed it you can still claim your username to make your Facebook profile page URL more friendly and easy to remember. A lot of people ask me why should they claim their username, and this is the best way I can explain it.
Well you really don't need a username but it's a nice to have for the following reasons.
Now let's get to the good stuff, to claim your username:
1. Click Account and select Account Settings.
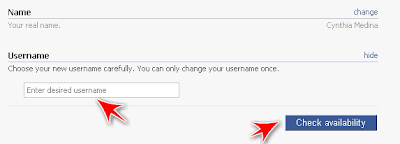
2. Click Change under Username.
3. Enter the username of your choice.
Remember this is going to be the URL for your Facebook profile page, for example: http://www.facebook.com/username. Doesn't that beat having a URL like this;http://www.facebook.com/profile.php?id=1337590867
4. Click Check availability button to check if that username is available.
5. Click Confirm if you want to keep this username.
Just keep in mind you can only change it once so think about it before clicking confirm. After you click confirm you will no longer see the Username option under Account Settings.
If you ever forget your username just click the link at the top right of your profile page and it will display your URL in the address bar. Your username are the characters after the slash (/).
Simple right?
My Facebook URL is http://www.facebook.com/cynthiamedina.
What's yours? Tell us in the comment section.
Well you really don't need a username but it's a nice to have for the following reasons.
- You have a more personalized URL that you can give out to your friends or publish on your social site's pages or website.
- A personalized URL gets you more noticed and you're easier to find. If you have a business or want to get noticed, this is something you would want. You get your brand noticed easier and quicker.
- It avoids online identify theft. If you don't claim your name some one else will. Just think about it, if people find you in search engines wouldn't you want the information found to be written or owned by you rather than by some one pretending to be you? That's why having blogs, web sites, and social site profiles are not a bad thing, they give you the opportunity to have a online identity and represent yourself.
Now let's get to the good stuff, to claim your username:
1. Click Account and select Account Settings.
2. Click Change under Username.
3. Enter the username of your choice.
Remember this is going to be the URL for your Facebook profile page, for example: http://www.facebook.com/username. Doesn't that beat having a URL like this;http://www.facebook.com/profile.php?id=1337590867
4. Click Check availability button to check if that username is available.
5. Click Confirm if you want to keep this username.
Just keep in mind you can only change it once so think about it before clicking confirm. After you click confirm you will no longer see the Username option under Account Settings.
If you ever forget your username just click the link at the top right of your profile page and it will display your URL in the address bar. Your username are the characters after the slash (/).
Simple right?
My Facebook URL is http://www.facebook.com/cynthiamedina.
What's yours? Tell us in the comment section.
Labels:
claim,
facebook,
personalize,
profiles,
username
An artsy person fulfilling my curiosity by figuring out the Hows & expressing them in some sort of creative outlet. I love art in all forms, technology, music, comedy, movies & travel.
Subscribe to:
Posts (Atom)